
ScriptCanvas
- 9 Devlogs
- 73 Total hours
Static Web app for scripting logic and generating interesting outputs through simple logic.
Static Web app for scripting logic and generating interesting outputs through simple logic.

I fixed a lot of spelling mistakes in the tutorial and help box sections. I think I should keep writing tutorials and docs to times before 1 am.
I also added a new output the plot  !
!
The script gets a x value and returns the matching y value. Those pairs then get displayed on a plot using graph.js.
During this addition I also reworked the core rust 🦀 engine a bit so now stuff that should be output independent, like creating a Rhai engine or compiling a Rhai script to an AST, is in its own file.
Then I added the rust logic and it just returns an array of X and Y value pairs when done.
Adding the UI and lifecycle stuff for the plot was rather easy because I kept everything pretty modular with easy expansion in mind. However styling the plot was rather complicated and I now have a enormous JavaScript Object detailing all the small bits and pieces to make the plot look alright!
PixelMatrix was always a temporary name as it is only really fitting for the grid output, so I renamed this project to ScriptCanvas. I think this is more fitting because it does use scripts and it also draws those on canvas elements!
I also added a README to the repo.
As testing on chrome and firefox also looked good I think I am ready to ship  !
!


I added a Help modal under the “?” button. It has some actions like opening the tutorial again and features some docs. There are docs on the specific output explaining what the output expects and listing all available variables in scope of the output.
So for Grid it explains how the script will be evaluated over all pixels in a grid and the script returns an RGB value setting that pixels color. Then it lists all the variables, like ‘x’ the x-coordinate of the pixel.
I also added a short tutorial which explains how to get a running script under Grid. I hope it explains all the concepts step by step and that it is understandable. Originally it was more of a tour of the UI and explained all the buttons, but I think that most of that is pretty self explanatory and the new tutorial is better at explaining how to actually use this.
Next up I will add 1 more output before shipping!
I am kind off getting frustrated with this project, I cant handle this stack anymore  , I yearn for hardware again. I am aiming to finish this in the next 2 weeks!
Well any ways here is what I did:
Until now the grid output was always a square, so if you had a non-square resolution it would be stretched to one. Now it actually gets the shape of the resolution and it uses the most of the usable space it can. I also added a option to return to the original method.
Initially I had some problems with drawing pixels to the canvas. I drew rectangles to the canvas but some image smoothing settings were adding anti-aliasing and similar stuff making the pixels look weird. I fixed that by just creating raw image data, but it was a cool effect for some situations, like generating a gradient. So I added a option to toggle this image smoothing of the browser. Sadly as it is browser based I’d probably has very different results on different browsers.
I did a bunch of css fixes to make the ui more resizable and trigger a bunch of stuff on resizing.
Then I added a tabbar and reduced the layout. In the normal layout the editor and output are side by side and when the screen is too small only one is shown and you can switch with the tabbar. It also moves the top bar actions into a setting pop up.

Some features might not be self explanatory, so I added this small tip tool when hovering above stuff for some time.
To not be stuck on this for too much longer I scrapped the idea of the landing page and I will instead add a tutorial.


I finally got everything working together. This means that you can now use print() and debug() in the script and it’ll output to the console ! It’ll tell you what was printed and at what pixel, e.g. [x:2|y:4] => here!.
I’ve attached a diagram of why some parts of this project are really painful to work with. Its largely due to the amount of wrappers needed, because of the memory and thread separation of the web worker/wasm. Reworking this was really not fun and just doing it better the 1. time would’ve saved me a lot of time.
The console won’t be in use all the time and not everyone will use it so I also wanted to limit the space it takes. I firstly reduced the standard space it gets down to 5% of the view height and then made it drag resizable. You can press and hold on the drag handle of the console and stretch it out over the output and editor. This way you can decide how much screen space you want to sacrifice. I used the pointer API so in theory this should work with all kinds of stuff from fingers to pens.
In the end the console was way more css intensive then I thought as it needs some  and css tomfoolery in order to scroll without blowing up the DOM.
I learned about Abstract Syntax Trees and made the wasm precompile the script to an AST before rerunning it a bunch of times with different scopes. This was another substantial performance increase decreasing the per pixel time form 0.04ms down to 0.004ms. Wow was the wasm unoptimized 
I finally added error highlighting. The line with an error now gets highlighted in the editor. During adding this feature with the Monaco editor I also accidently bumped my bundled js to 500kb  . This was due to it importing a bunch of syntax stuff for different languages. Thankfully changing one
 Monaco.something to monaco.something resolved this 
I noticed that you couldn’t resize the app to something smaller. You could however make it smaller and then reload. Meaning that it was able to come up with a good layout but something was greedy and holding on to its space. Width wise this was easy to fix by adding a dynamic sizing flag to the editor and some min-width: 0s to some elements, but height wise i couldn’t get it to work. Turns out even with dynamic sizing the editor is still not the biggest fan of being resized so I had to add a ResizeObserver and call the editors layout method to make it reconsider its size
I will now implement a better UI for smaller screens, but first I need to declutter my css and html to make it more maintainable  .
.



Those now also have better tui like styling. I added sqaure brackets [] to the ends, the hover background highlighting and a blinking underscore if you focus on it. Though am unsure whether it is clear enough that you are supposed to enter text into them. If you’ve got any improvement ideas let me know.

When something is loading I can add the loading class which displays the typical tui animation spinner before it. The one made up of brail dots ⠧

I felt that the run button could be unnoticed so I added an icon to the middle of screen. It also shows the loading to make it more clear that the script is actually being run.
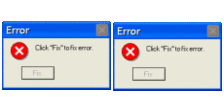
Instead of just having some red text in the console I add a real error pop up with a blinking dashed red outline.

I spent some time thinking about doing a bunch of stuff to make my wasm multi threaded and async, which included using nightly features, a service worker shim to change http headers, etc. Because I felt that the script running was way too slow and I wanted better performance and the ability to easily cancel the running wasm. Currently the wasm is blocking and goes over each pixel one by one.
But before I implemented that I did some other performance changes, like only creating 1 shared rhai engine for all pixels. Before every pixel created its own rhai engine. This change was way more substantial than I thought, as it took the per pixel time from 0.5ms down to 0.04ms . This means 255*255 pixel or 65k pixel don’t take 12s but 2s. This is such a change that I think implementing all the async and multi threading would just be a waste of time, so I’ll stash that idea for now.
I also styled the console part and added all the ui logic. I want to give the user the option to use a print function in there script for debugging purposes. Then in the console it’ll show on which pixel the debug comes from and what it says. But as the image can get pretty big and the user might print once or more per pixel, just adding some Nodes to a console div would probably blow up  everything. So at first I experimented with a canvas. The canvas overlays on the console div and then behind it is a big spacer which allows for scrolling, some code would then change what the canvas shows based on where the back is scrolled to. After I had gotten it to display some logs nicely, I realized that this way doesn’t allow the user to highlight and copy the logs, which is probably something someone might want to do.
So I switched the canvas out with a normal div. Instead of drawing the logs to a canvas the logs do get added as nodes, but only the visible ones and the scrolling changes which are shown. This way the user can interact with them like normal text and the DOM doesn’t have to render 1k+ nodes. This seems to work really good, the only problem was getting the scrolling to work while the log nodes occupy the same space, but with some css trickery and EventListeners I can pass any scrolling done on the logs through to the background scrolling element.
I am still working on the wasm part of allowing the user to use print(). While implementing that i had to change what it outputs and refactored the rust project structure. When I then got to the part where the browsers main ui thread interacts with the web worker which runs the wasm, I realized how badly that part was written, with so many loose interfaces and strings. So I am currently still refactoring that and trying not to loose my mind. Still not a big fan of and 


It can be really frustrating if the output exceeds 255 and everything errors out. So I added a auto clamp checkbox, which just clamps the output to the expected range of 0 to 255.

I also added a check box for hot reloading. When you stop typing, the script will automatically run. No need to press the run button. Probably a bit annoying on larger resolutions so you can disable it.

I also started building the real UI. Initially I just did the layout:
The output part also has a tool bar with output specific settings.
An explanation of the app will go on the index and it will have a link to /app where the actual stuff is. This way I don’t have to give any screen space up for an introduction when not needed. Currently the index is just a redirect.
Initially I wanted to go with a windows 8 panel style UI, so nothing rounded and only big rectangular tiles. But during experimenting I made the tile only as big as its text and when the background color got highlighted it reminded me of a TUI button. So from that point on I decided to try and style my entire site like that.
I think I can pull this TUI look off, but the current styling is definitely not finished. I do however already like the checkboxes, which are styled like [ ] and [*], and the dropdown select. The select was way harder to do as you can’t really style the vanilla element, as it depends on os and browser styling. So you have to create your own.
I would say I learned a lot new things about css. Especially stuff like ::before and ::after are super handy for the look I am going for.


 DEMO HERE
  and as soon as
  github gets itself back together I can also push the newest changes to it!
I added options to the top. You can switch the output type and script language. But seeing as there currently is only 1 language (Rhai) and 1 output type (Grid) they are kinda pointless. I also added output specific options, for Grid it is currently just the resolution. Also I added a spinner to the run button to indicate that the script is running but that didn’t work until a refactor/feature mentioned later.
The rest of the time was all spent on refactoring. But I do think it was worth it and it is now way easier to add new features.
I introduced a state system where each output type has its own module. Each output only exposes a common interface with a init, deinit and pipeline method. This way other parts, don’t need to deal with what output is set. Each output also deals with its specific settings and UI itself.
->
I fully switched from to . I was kind of fed up with the loosey goosey attitude of javascript where nothing is really defined. Typescript doesn’t fix that entirely but does help to find a lot more bugs when writing the code and not at runtime.

As does need some sort of bundler/builder I set up vite for the project. This also means I can make the repo more source files only. Before I had the compiled wasm also in the repo, but now it gets compiled together with vite’s build process in the github action. Probably vite also has some other performance benefits.

As I mentioned before I added a spinner to when the script was being run to show that something is actually happening, but the that wasn’t showing. Because I had everything running off of the main thread calling the WASM blocked everything else even the UI and the browser would ask whether to close the page. The solution is to move it to a web worker, which runs in a separate thread.
This was probably the most difficult thing, because it required major changes and it is a bit more complicated because of WASM. When a WASM function returns something, it normally uses a pointer to shared memory, so that there is no unnecessary cloning, but because the WASM runs in the memory of the web worker the main thread can’t access it. So I had to work around that.


I got rhai to work. It took a bit to figure out how to expect the script to return an array of 3 u8’s, but after figuring out that all rhai numbers are i64 and then figuring out how to downsize that to u8 it works!
Later I then added the current coordinates into the scope and a rand function to generate noise.
A bare textarea element for script input is pretty bad so I switched to the monaco editor. Its the same one VSCode uses so most of us should be pretty familar with it and its keybinds. It took some time to figure out how to load monaco from CDN and not build locally. I also had some cosmetic bugs with the minimap, so I just disabled it as the scripts should be rather short and its not that useful anyways. Using localstorage the script now also persist between sessions.
As you can see the output isn’t clear but has these weird white lines. These do go away after running the script multiple times. This due to the browser doing some post processing like anti-aliasing on the drawn rectangles and it adds some semi-transparent pixels to the edges. This is especially bad if you pass use decimal values as coordinates to draw to the canvas, which I am doing to fit my pixels on there. I tried multiple methods to disable this post-processing for drawing filled rectangles, but nothing worked.
The solution is to use a hidden canvas, draw the output at native resolution to it and then transfer the image from that canvas to the real one. The putImage function does allow me to disable post processing and adjust the destination size. Now it works and the bare minimum is here .
As always you can test it here! It automatically runs off of the latest commit.


I really like experimenting with random functions and math relations and then displaying them. So I want to make this website where you can write a script to run on every pixel and then display the result. Originally this was just rust code creating ppm pictures, but a web app is more accessible.
I am still not the biggest JS fan and more comfortable with rust, so I will use WASM to make rust run in the browser. This also has some performance benefits and I can easily add scripting languages
The first step was to have something I can draw pixels to with JS. I went with a canvas and drawing filled rects to it.
Rust to WASM seems to have a very mature pipeline and its very easy. You just write normal rust code and all functions, types, etc you want to expose to JS you can use #[wasm_bindgen] from the wasm-bindgen crate. Then after installing wasm-pack you can run wasm-pack build --target web to compile the rust to wasm. It also automatically generates the JS glue and TS headers. In JS you just have to import a init function and the exposed wasm functions you want to use. The browser does the rest!
Everything will run locally in the browser, which also means we can use githubs free static hosting , which I already setup with a github action, check it out here! Currently I have only got a bare minimum UI and no language support. Next on my list is adding Rhai support (scripting language similar to rust) and getting that to actually output some pixels.

